Tuesday, September 17, 2013

Lemon Garlic Shrimp & Cheesy Grits


Weeknights never tasted so good! 

           
Everybody got time for that! 

I’ve wanted to make shrimp and grits for years.   Perhaps devouring grits during numerous 3am visits to the local Waffle House subliminally motivated me.  Today I took the plunge and realized just what I’ve been missing.  I’m a Georgia boy, so this classic southern dish was long overdue.

It’s a cheap weeknight meal.  It’s a classic southern dish.  It’s a phenomenal dinner that can easily be made--and it totally rocked tonight!  Coming back from a great workout after work, I still had enough time to whip this up within 30 minutes.  Silky, cheesy grits meet a satisfying sauté of garlic herb butter, shrimp and lemon juice.  The lemon juice does a phenomenal job of delicately cutting through the cheesy grits--offering a ying-yang experience.

Serves 4

INGREDIENTS

Cheesy Grits
1 cup grits (not instant)
4 1/2 cups water
1 tsp garlic powder
salt to taste
3 oz cheddar cheese, cut into small pieces
3 slices muenster cheese
1/2 cup parmesan cheese

Lemon-Garlic Shrimp
3 tbsp Kerrygold Garlic-Herb butter (or regular butter)
12 oz uncooked shrimp (61/70 size)
4 garlic gloves, minced
juice of 1 lemon
1/2 tsp white pepper
1/2 tsp salt

Paprika to garnish
Parsley to garnish (I didn't have on-hand for today)

“No self-respecting southerner uses instant grits!” – My Cousin Vinny

DIRECTIONS

Grits
Boil water and slowly add grits.  Reduce heat to low, cover,  and periodically stir for 14 mins (ensuring grits don't stick to the bottom of the pan).  Add cheeses, garlic powder, and salt.  Stir for 3 additional minutes, or until cheese is melted.  Turn heat off and keep covered.

Lemon-Garlic Shrimp
Before you cook the grits, submerge frozen shrimp in lukewarm water to thaw.  Drain, then sprinkle with salt and white pepper.  Toss lightly and let sit while grits cook.  After grits cook, heat butter in skillet.  Add shrimp and saute for approximately 2 minutes.  Add minced garlic.  Flip shrimp and cook for an additional 4 minutes.  Add lemon juice, briefly stir,  and remove from heat.

Place cheesy grits on bottom of bowl, top with paprika, parsley, and shrimp.

A perfect pairing.  Any New Zealand Sauvignon Blanc is great, too.
Thanks Tony and Allie for the vino!


Adapted from:  www.keyingredient.com


Sunday, September 8, 2013

Heirloom Tomato-Basil Tart

Today, we pay a great homage to the heirloom tomato.  Eating what’s in season is preferable, and today’s visit to Rutiz Farms (www.rutizfarms.com) inspired me to make this recipe once again!  This is one of those recipes that impresses and, I believe, one that you will never forget.  Your house is guaranteed to smell like garlic, basil, butter, and epicness.  It's not an "instant" recipe, but well worth the effort.


Green zebras, Red brandywine, and Yellow brandywine heirlooms. 

I'm motivated to make this tart whenever I see great heirloom tomatoes.  Heirlooms have more flesh when compared to standard tomatoes.  More importantly, these are organically grown and full of fresh tomato flavor unlike the flavorless tomatoes that we get from the grocery store.  They are so tasty that you can simply slice them thick, sprinkle grey salt, drizzle olive oil over them, and nosh on them with a crusty baguette to great satisfaction.  Of course this blog is about phenomenal recipes, so below is a step-by-step tutorial on how to make this masterpiece.  

INGREDIENTS

Tart Crust
1 ½ cups white unbleached flour
½ tsp salt
½ cup butter, chilled and cut into pieces
3-5 tbsp cold water
2 tbsp fresh basil, chopped
1 tsp garlic, minced

Topping
12-16 oz piece of mozzarella cheese, sliced into 1/2 inch discs
1 bunch of fresh basil
3 large heirloom tomatoes, ½ inch slices  (or 4-5 regular store-bought tomatoes)
4 tbsp grated parmesan cheese
1 tbsp garlic, minced
black pepper and grey salt (can substitute any sea salt)
2 tbsp extra-virgin olive oil to drizzle


DIRECTIONS
**If you don't have access to a food processor, use the back of a fork to crush the butter pieces into the flour until the mixture resembles a coarse and uniform texture.  Minimize handling to keep butter cold.

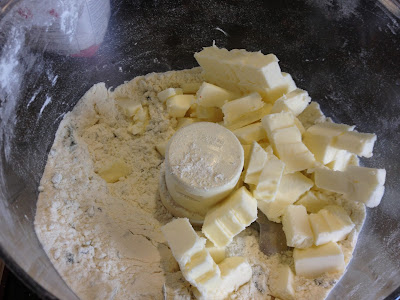
Cut the chilled butter into small pieces.  Place in a food processor with the flour and salt.   
  
Process on dough setting with a dough blade until the mixture is uniform.  Add 4 tbsp of water, the chopped basil, and minced garlic.  Continue to mix until the dough comes together.  Add more water, if necessary, to form dough.


Minimizing handling of the dough, form the dough into a ball and press into a flat disc.  Wrap in plastic wrap and refrigerate for an hour. 

Roll the pastry between two sheets of plastic wrap until a ¼ inch thickness is achieved.  It will be firm so put some elbow grease into it!!  Place dough in an 11-inch tart or pie pan, trimming edges.  Poke entire dough surface with a fork.  Refrigerate for 15 minutes.  Preheat oven to 375.  Place chilled tart crust on a baking sheet and bake for approximately 30 minutes (turning in 10-min increments) until slightly golden brown.  Remove from oven.

Sprinkle garlic over crust and place tomato slices, mozzarella, and basil in pan.  Top with salt, pepper, olive oil, and parmesan.  

Bake for 25 minutes at 450.  Tilt tart and spoon off excess juice during baking, if juice is present.    Remove from top portion of tart pan (keep on bottom portion to support) and slice as desired.  Serves up to 6.

California central coast Pinot Noir courtesy of Tony and Allie!

Pair the tart with a chilled white wine of your liking (we prefer Sauvignon Blanc) or a light California central coast Pinot Noir for a taste of summer!


Adapted from: The Italian Cooking Encyclopedia 


Saturday, September 7, 2013

Veggie Israeli Couscous


A quick, healthy, and satisfying meal!


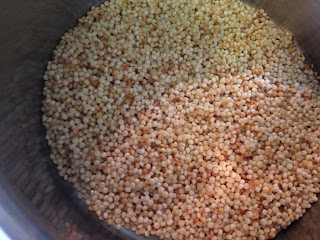
Periodically, we amass a handsome amount of farm-fresh veggies in our fridge.  This quick and easy recipe puts them to good use.  Feel free to substitute ingredients to your liking.  Don’t be afraid of the couscous if you’ve never tried it.  Think of it as tiny pasta balls, but cooked almost like rice.  The Israeli type is much more substantial than regular couscous.  This recipe is perfect for a quick weeknight meal.

INGREDIENTS
1 ½ cups Israeli Couscous
2 cups water
2 tbsp olive oil
1 zucchini, diced
1 medium eggplant, diced
1 onion, diced
¼ cup sweet peas
1 diced roasted red bell pepper
3 cloves garlic, crushed
1 bunch basil, chiffonade
¼ cup white wine
salt and pepper to taste
parmesan cheese to top
olive oil to finish

DIRECTIONS
Over medium heat in a medium pot, periodically stir 1 tbsp olive oil and the couscous for about 5 minutes, until some of the couscous is toasted to a golden brown.  Slowly add 2 cups of water.  Bring to a boil and immediately reduce heat to medium-low.  Place lid on pot and let simmer for 11 minutes.  Remove from heat and fluff with a fork.

The amount of browning that I wanted for this batch.

In a separate skillet, heat 1 tbsp olive oil over high heat.  Add onions, zucchini, eggplant, peas, roasted red bell pepper, ½ tsp salt, and ½ tsp pepper.  Sauté, stirring occasionally, for 5 minutes.  Add crushed garlic and half the basil.  Stir for 1-2 minutes, taking care not to burn the garlic.  Add white wine and scrape the bits off the bottom of the pan.  When the wine has mostly evaporated, remove mixture from heat and add the remainder of the basil.  Stir veggie mixture with cooked couscous.  Taste for seasoning (salt and pepper).

Serve with parmesan cheese and a drizzle of olive oil over the top.   Serves 3-4.

Monday, September 2, 2013

Homemade Pasta Meditteraneo


Once in a blue moon, I choose to make a marathon dinner.  I’m talking about 3 hours of active cooking.  This is my therapy.  Knife in one hand; wine glass in the other (figure of speech for the safety conscious).  Great music playing at elevated levels in the kitchen.  Frank Sinatra, Rock, Dance…anything but country.  This is what I call livin’.

“Mise en place" is my first priority.  This is the French technique where you slice, dice, grate, and crush all your ingredients beforehand.  This is Food Network’s secret to make cooking seem so simple--everything at the ready in small bowls.  All you have to do is throw them in the pan at the appropriate time.  This is the only way to cook with total control.  Recipe and instructions below.

Mise en place ready to go!

Making homemade noodles is an event.  Special equipment is highly recommended.  You can get the hand-crank pasta roller or the fancy schmancy Kitchen Aid attachment.  I don’t recommend using a rolling pin.  Either way, the result is pasta that makes you question if store bought is good enough.  These types of tastes & textures make me a dish snob.  You can sell this stuff.

Homemade Spaghetti Noodles
Serves 6 adults

INGREDIENTS
3 1/2 cups all-purpose flour (King Arthur’s Flour preferred)
4 eggs (organic are best)
1/4 tsp salt
1/4 - 1/2 cup extra virgin olive oil (to achieve elastic consistency, not sticky to the touch)

DIRECTIONS
Combine ingredients and knead until an elastic consistency is attained (combine in flour "well" or in a bowl).  Set aside 20-30 minutes.  Cut into 4 even pieces.  Press each piece into a flat disc.  Run through pasta roller several times, folding pasta to add layers for each pass.  Achieve a desired thickness and use pasta cutter to make spaghetti.  Boil in salted water, approximately 5-8 minutes, until al-dente, depending on thickness of the noodles.  Overcooked pasta will break apart easily; close monitoring is recommended to maintain firm texture.


Prepping the "well".  You can also use a bowl.

Eggs, salt, olive oil in the flour well.  Combine well.

After kneading and resting.  Portioning into manageable pieces.


Lots of pasta sheets ready to be cut into noodles.  I made this contraption to aid with pasta making.

Pasta sheets being cut into noodles.


Ready to boil! 

Gourmet Primavera Sauce
Serves 6 adults

INGREDIENTS
1/4 cup extra virgin olive oil
2 medium onions, diced small (see Dicing technique)
1 package button mushrooms, sliced into 4 pieces
1/2 large zucchini, diced small
4 large tomatoes, diced
1 package basil, chiffonade
15-20 pitted kalamata olives, halved
5 cloves of garlic, minced
1/4 cup white wine vinegar
1/8 tsp red pepper flakes
1/4 tsp salt

Gray salt for finishing
Parmesan cheese for finishing

DIRECTIONS
Prepare all ingredients and place in individual bowls for the mise en place.  Heat ¼ cup olive oil over medium heat momentarily.  Introduce mushrooms, red pepper flakes, and the salt.  Sauté over medium heat for approximately 3-5 minutes, periodically stirring.  Reduce heat to medium low and add onions and sweat for 5 minutes (do not brown onions).  Add garlic and stir for 2-3 minutes, taking care not to brown the garlic.  Add tomatoes, olives, vinegar, half of the basil, and zucchini.  Turn burner to high and heat mixture until zucchini is somewhat tender to the bite, not mushy.  Turn heat off and slowly reheat just prior to serving.


All ingredients ready to go.

Getting some height for the photo!


Homemade Pasta Meditteraneo


FINISHING
Top the assembled dish with grey salt, parmesan cheese, a drizzle of olive oil, and a chiffonade of basil.  The dish is purposefully light on the salt, so use as much grey salt as you wish.  Bon appetit!


This is an original recipe and I’m more than happy to share it with you!  Looking forward to your comments!  Much thanks to Leocadia Photography for coming over for a wonderful night of pasta making, wine, and great conversation!

Knife skills -- Onion dice

When I first started cooking, I hated to cut onions.  I could never attain a uniform dice and it seemed like I was chopping forever.  My pain, your gain.  Hope this makes your cooking more enjoyable and timely!

 Halve onion like this.

 Peel off skins.

 First horizontal slice. Add slight pressure from above.  Leave end attached.

Second horizontal slice.  Leave end attached.

End is still attached.  Vertical slices to desired widths.

 Turn onion 90 degrees and slice.  Instant, uniform dice!

Ready to cook!


Grilled peaches and pecans

Today's dessert was a grilled peaches recipe.  We got some organic peaches in our weekly harvest box that were absolutely phenomenal.  Great bite to the flesh, an irresistible scent, and perfect sweetness.  What better way to prepare them than to grill them!  Andrea used a caramel sauce and frozen yogurt instead of what the recipe called for.  The pecans added a satisfying texture.  Much thanks to my mom for sending us some Georgia pecans!  Nothing better than food from the source.

Late harvest riesling, anyone?

Adapted from: http://thepioneerwoman.com/cooking/2013/06/grilled-peaches-pecans/


Grilled Veggie Quesadillas


Today was somewhat of a lazy day and we wanted to make something that didn’t take too much effort.  We’re 1 month into our 2 month no-meat diet--there are plusses and minuses that come with that.  On the plus side, we’re constantly trying out new recipes.  On the downside, a satisfying vegetarian recipe usually takes a lot of prep and cooking.  Not with today’s recipe, though.  It’s easy enough that anyone can make it.

Andrea found a recipe online that gave us a good idea to grill quesadillas rather than pan-frying them.  We make a lot of grilled dishes, so we were excited to try this and potentially add it to our repertoire.  Grilling the quesadillas was a great success!  Got some smokiness from the grill and the shells themselves were irresistibly crispy.  We changed the recipe to suit our preference, but you can stuff these with whatever you like!

Before cutting into 4 pieces.  Great color and crispiness.

Gooey goodness revealed!  

A must-have pantry item.  I sprinkle this magical stuff on most anything Mexican.  For today's recipe, I put a little inside the quesadilla.


Grilled Quesadillas
Yield – 4 quesadillas

INGREDIENTS
2 cups shredded Mexican blend cheese (not Kraft, we prefer Sargento)
1 roasted red bell pepper (roasted, skinned, seeded, and diced)
2 roasted poblano peppers (roasted, skinned, seeded and diced)
1 sauteed yellow onion 
2 tbsp vegetable oil           
8 flour tortillas, 8-10 inches in diameter
1 bunch cilantro leaves, chopped
Sour Cream to top (optional)
1 tsp Chef Merito’s carne asada seasoning (optional)

DIRECTIONS
Lightly brush tortilla and place face oil side down.  Top with desired toppings. Place tortilla on top and brush top with oil.  Place on indirect heat directly on grill grates.  I had the burners on low, but the burner directly under the quesadilla was off.  Flip halfway through cooking.  Grill heat should be low enough as to not burn during 10-15 min grill time.  Result should be melted inside, crispy outside.

Adapted from recipe http://huff.to/vV1ADx.